| 1 |
0:00 |
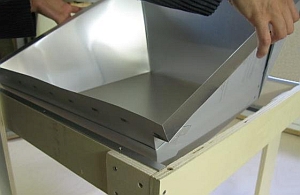
In most cases, the available offset plates are smaller than the inner box template. |
| 2 |
0:05 |
Determine the size of the strip to be used for flanging. Make the strip some centimetres wider than needed. Its length is determined by the folding device Jig 4.1a |
| 3 |
0:24 |
Cut the strip from another plate. |
4.2.2
Flanging the plates
|
| 1 |
0:00 |
Preparing the plates for flanging: Turn the cut strip over and bend one edge.
Make two 15 mm cuts in the large plate and bend it. The distance between these cuts is determined by the width of Jig 4.1a |
| 2 |
1:30 |
Apply silicone to the flanging seam of the strip. |
| 3 |
2:04 |
Fit the two parts into each other. |
| 4 |
2:20 |
First press and hammer just the ends of the flanged seam, so that the joined plates cannot slip out. |
| 5 |
2:31 |
Hammer down the seam over the whole length. Use a strip of hard wood without sharp edges. (This strip gets dents with time and must then be replaced by another.)
|
| |
Important information:
Before proceeding further, you should read the note on simplifying the folding of the inner box at the end of this section.
4.3
Preparing the flanged blank for folding
4.3.1
Transferring the template onto the blank
| 1 |
0:00 |
Stack two flanged blanks and fix them with clamps. |
| 2 |
0:24 |
Tape down the template on the two blanks as shown. |
| 3 |
0:57 |
Make yourself familiar with the folding process using the copied cardboard model in Appendix A1.4a |
| 4 |
1:36 |
Mark all intersections of the lines by gently punching them with a steel nail. |
| 5 |
2:05 |
Label one of the two blanks as a template and set it aside. |
|
 |
4.3.2
Cutting out the blank.
| 1 |
0:00 |
Mark out all outer lines on both blanks using a box cutter. |
| 2 |
0:59 |
Remove all excess bits by breaking them off with the aid of a table edge. |
| 3 |
1:28 |
Use tin snips for cutting through the flanging seams. |
|
|
4.3.3
Preparing the corners for grooving
| |
- |
Start by connecting the points on the template using a marker to find them later. (No Video Clip) |
| 1 |
0:00 |
Prepare the front corners of the blank for folding according to the folding plan (See below).
To avoid mistakes, encircle all marks. The cardboard model gives you some orientation. -
The new, simplified template will make work much easier. |
| 2 |
3:42 |
Repeat the same at the rear corners. With no flanged seam, the process is much easier. |
|
|
4.3.4
Getting familiar with the process of folding
The detailed folding plan in appendix A1.5 contains all details of how the single lines must be prepared, as well as the sequence of the single folding steps.
| 1 |
0:00 |
Cutting |
| 2 |
0:31 |
Scratching |
| 3 |
0:59 |
Grooving |
| 4 |
1:45 |
Grooving on the back side |
|

|
4.4
Bending and Folding
4.4.1
Preliminary remarks:
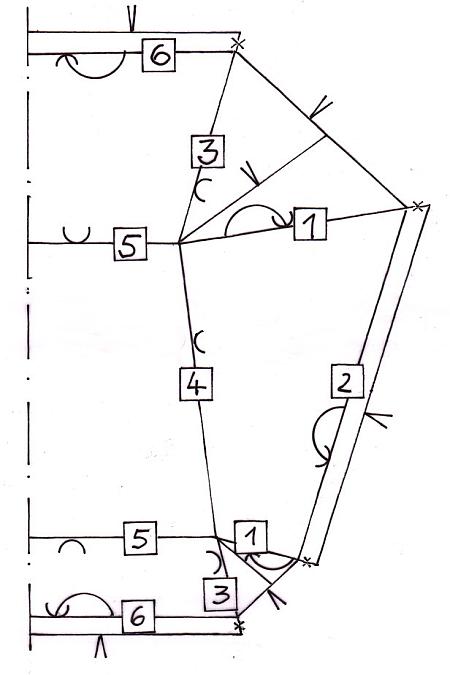
The lines to be folded can be derived from the adjacent folding plan.
Folding Rules:
The digits in the smale squares indicate the sequence of processing.
Always bend from the side, you are going to fold to. That is:
- Bending from the back side for 1 and 2.
- Bending 3, 4 and 5 from the front.
- 6 will only be folded when front and back of the box have been folded.
|
 |
For folding, six different folding devices, Jigs 4.2 a-f are used (see adjacent table).
While you can use longer folding jigs than stated for some of the steps, in others you must stick to the instructions. This is indicated in the text and the adjacent table.
There is a logic order of processing steps, which should be followed strictly.
|
| Folding devices, Jigs 4.2 a-f for folding the inner box |
| No. |
Length |
Location |
Folding step No. |
| a |
35 cm |
back down Ls |
5 |
| b |
40 cm |
side down Ls
side down Lw
front down Ls
|
4 und 5 |
| c |
55 cm |
front top Ls
back top Ls
|
6 |
| d |
72 cm |
back down Lw |
5 |
| e |
79 cm |
front down Lw |
5 |
| f |
91 cm |
front top Lw
front top Lw
|
6 |
|
4.4.2
4.4.2 Folding steps 1 - 5
Folding step 1:
Bending back the lateral flaps of the side walls
Turn the blank clean (front) side down.
| 1 |
0:00 |
The folding plan indicates the order of the single folding steps |
| 2 |
0:06 |
Bend the flaps of the side walls back fully. Warning: Do not press too hard to avoid any breaking at the folding edge. |
|
 |
Folding step 2:
The rear side remains up
| 1 |
0:00 |
Bend the upper flaps on the back of the side walls. Jig 4.2, serving as a folding device, is aligned with the bent side flaps. |
| 2 |
0:27 |
Use two folding devices to fold the upper flap to approximately 70° |
| 3 |
0:56 |
Complete the bending using the pressing block Jig 4.3a |
| 4 |
1:09 |
Check the angle using gauge Jig 4.4a; if necessary, adjust, using J Jig 4.3b |
|
|
Folding step 3:
For the next steps the front side is up.
| 1 |
0:00 |
Bend the lines for the lateral flaps of the front and rear wall |
| 2 |
0:38 |
Fold the flaps up approx. 90° |
| 3 |
1:14 |
In bending the flaps of the front wall, the edges cross the flanged seam from joining the blanks. Groove the seam with a blunt chisel |
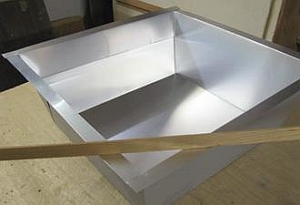
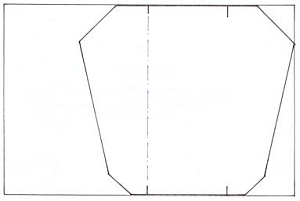
Adjacent picture:
Blank after folding step 3: (the flanged front pane to the front, left)
- the lateral flaps of the side walls are bent back all the way (not visible)
- the top flaps of the side walls are folded back by 80°
- the lateral flaps of the front and rear panels are folded up
|
 |
Folding Step 4:
Important:
Only now the four lines that mark the bottom are bent. The lower ends of the already bent side flaps in the front and at the back serve as folding aid.
Now fold up the side walls using folding Jig 4.2b (39 cm). On the inner side, a folding jig of any length may serve.
| 1 |
0:00 |
Bend the side panels. The folding device is aligned to the lower lateral flaps in the front and in the back.
Use any folding jig except Jig 4.2a+b |
| 2 |
0:13 |
For folding the side panels, use folding Jig 4.2b on the outside. On the inside use any folding jig except Jig 4.2a |
| 3 |
0:54 |
Fold the other side in the same way. |
|
|
Folding Step 5a:
| 1 |
0:00 |
Shift the box to the edge of the table. This way, when folding (at 1 00:18), the rear wall will not obstruct the positioning of the outer folding jig. |
| 2 |
0:14 |
For bending and folding the back panel, use folding Jig 4.2a on the inside. Make sure that the flaps are outside of the side walls of the box. |
|
|
Folding Step 5b:
| |
- |
Folding step 5b is similar to 5a. Place the folding jig, so that it is aligned to the ends of the side.
Groove the line. Then bend, using folding Jig 4.2b on the inner side and a longer one on the outer side. |
|
|
| 1 |
0:00 |
Make small incisions into the four lateral flaps |
| 2 |
0:03 |
Fold back the flaps around the underlying flaps |
| 3 |
0:06 |
The small flaps connect the front and rear plates to the side walls |
Warning:
The small flaps cannot be bent back again; they will break. If necessary, rather create another small flap.
|
|
 Folding step 6:
| 1 |
0:00 |
Place the inner box in the stand Jig 5a. The upper aluminium rails of the stand must point to the front and the rear. |
| 2 |
0:10 |
Place pressure board Jig 4.5a against the panel from inside. |
| 3 |
0:24 |
Bend the upper flap from the outside and fold it outward, using two long folding jigs. |
| 4 |
1:24 |
Complete the bending using the pressing block Jig 4.3 |
| 5 |
1:30 |
Check the top flaps all around. |
| 6 |
1:55 |
If needed, correct with Jig 4.4 |
|
|
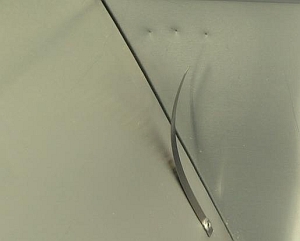
A bimetal strip is riveted to the left side wall of the inner tub. It will indicate the temperature in the box at marks of about 50°, 100° and 150° Celsius by bending itself.
| 1 |
0:00 |
Check the size of the hole in the bimetal strip. You may have to enlarge it by using a 3.2 mm drill at high speed. |
| 2 |
0:14 |
Use the marking aid Jig 4.6 and a blunt tool (here a blunt screwdriver) to mark the scale in the rear wall.
For this, the box rests with its rear wall on a layer of newspaper on the workbench. Mark the position for the rivet with a felt tip |
| 3 |
0:41 |
Center-punch and drill the hole for the bimetal strip (3,2 mm). |
| 4 |
1:18 |
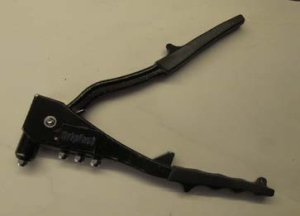
Rivet the bimetal strip Nr. 16 using rivet Nr. 1 |
|
 |
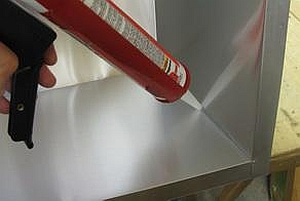
Now with the tub edges fixed, they get sealed with heat resistant silicone (up to 180° C), to avoid steam penetrating into the insulation.
| 1 |
0:00 |
Cut the nozzle at a right angle to a diameter of about 8 mm. |
| 2 |
0:09 |
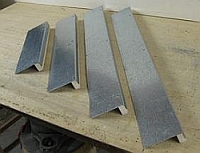
To seal the edges, hold the cartridge at a right angle, applying the silicone at a slow and constant speed
(a tip for beginners: First practice applying silicone on angled strips of wood). |
| 3 |
0:30 |
Apply silicone to all four edges. |
|
 |
Differences of Model Lw
Preliminary remarks:
Paper template Ls is used.
Same as with the Ls, two blanks are to be produced for the Lw. The second one will later replace the paper template during serial production.
Divergences in the production of the Lw are shown in Clips 19-29.
Preparing the blank for the inner box for folding
Part 1: Preparatory steps
| 1 |
0:00 |
For the blank of the inner box of the Lw place two offset plates (minimum size 700x 900 mm) next to each other. They will be joined by flanging. |
| 2 |
0:22 |
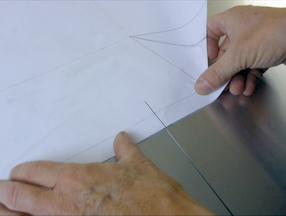
Place the Ls template onto the plates with its marks at the front and the rear edges lying on the joint of the two plates. (These marks will be of relevance in Clip 4.24) |
| 3 |
0:31 |
At the front and the rear edge of the paper template draw a line on both plates across the joint. |
| 4 |
0:45 |
The following steps will be illustrated with the help of a smaller model. |
|
 |
Part 2: Explanation of the work steps on a model
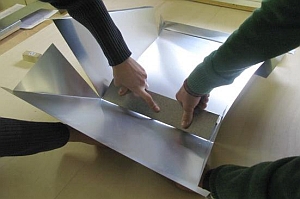
| 1 |
0:00 |
The working steps are shown at hand of a downsized model: The plates of the model lie side by side (taped together). The front and rear markings can be seen. |
| 2 |
0:09 |
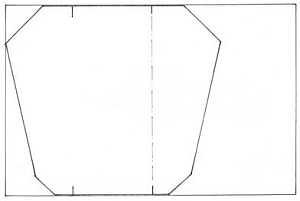
The paper template applied to the front edge of the model plates shows the 20 mm wide upper rim of the inner box that will be folded outwards in folding step 6. |
| 3 |
0:21 |
Both parts of the model plates are flanged in the middle. |
| 4 |
0:27 |
In the area of the flaps the plates must be cut out beforehand in such a way, that they are no longer on top of each other. |
| 5 |
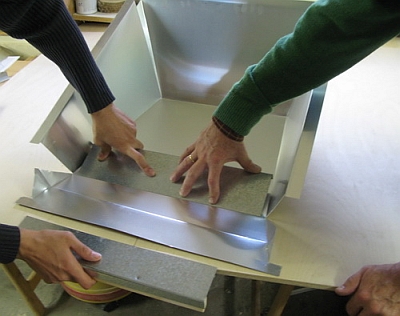
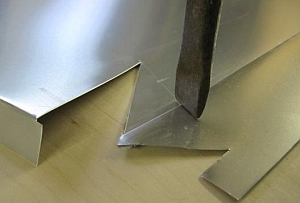
0:31 |
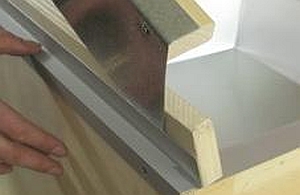
At hand of the flanged model two wooden strips make visible, that the flanging seam, which also runs over the upper flap,
would prevent the glass frame from lying tightly on the inner box. |
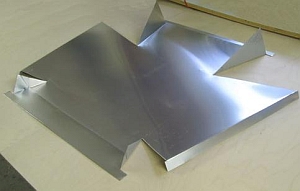
| 6 |
0:44 |
On the other hand, in the area of the cut out flaps the seams are no longer on top of each other and the wooden strips lie close together. |
|
|
Part 3: Trimming the edges of the model
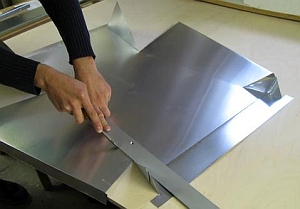
| 1 |
0:00 |
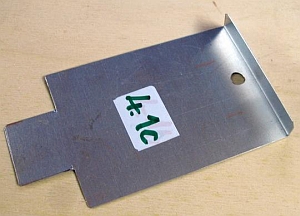
Use marking Jig 4.1c to draw the cutting lines on both plates. |
| 2 |
0:31 |
Use a box cutter and tin snips to cut and break off the corners. |
|
 |
Part 4: Flanging the parts of the model
| 1 |
0:00 |
Fold the prepared flanges of the plates. |
| 2 |
1:23 |
Important: Add silicone to the plate with the flange folded backwards. |
| 3 |
1:43 |
Join the two plates. |
| 4 |
2:04 |
Cut the joined plate to size at the front- and back side. |
| 5 |
3:33 |
Remove the overlapping parts. |
|
|
Part 5: Joining the plates for the blank of the inner box
| 1 |
0:00 |
Step 1: Fold one plate forwards |
| 2 |
0:15 |
Step 2: Fold the other plate backwards |
| 3 |
0:30 |
Step 3: Add silicone to the plate that was folded backwards. |
| 4 |
0:41 |
Step 4: Join the two plates |
| 5 |
1:03 |
Fix the two plates using clamps and compress them |
|
|
Part 6: Mark the blank for the Lw using the template of the Ls.
(once only)
| 1 |
0:00 |
The cardboard model shows how the Ls template can be used to mark also the Lw blank.
The marks at the front and rear edges of the Ls template are now important: First the ones at the right side are at the flange,
then shift the left ones to the flange. |
| |
- |
Like with the Ls, prepare a metal template for serial production together with the current blank:
Put two blanks exactly on top of each other and fix them using adhesive tape. (No Video Clip) |
| 2 |
0:21 |
Fix the paper template using tape, so that its front edge and right mark are aligned with the drawn line. |
| 3 |
0:50 |
Mark all left side intersections on the plate using a steel nail. |
| 4 |
0:58 |
Repeat these working steps on the right side of the blank. |
|
|
Part 7: Trimming the blank
| |
- |
Trim both blanks all around.
- Label one with a T and set it aside (rolled up). (No Video Clip) |
|
|
Execute folding steps 1 - 6
| 1 |
0:00 |
Execute folding steps 1 and 2 on the blank for the inner box. (step 2 without video
clip) |
| 2 |
0:44 |
Perform folding step 3 in the established way (see Clip 4.12). |
|
|
| 1 |
0:00 |
Place an folding plate with any length on the inside and fold the ground line |
| 2 |
0:23 |
From the outside fold the side panel to 80° with the help of folding Jig 4.2b |
| 3 |
0:57 |
Tighten the edge using pressure pad Jig 4.3 |
|
|
| 1 |
0:00 |
In folding steps 5a and 5b the edge crosses the flanged seam. Groove the seam using a blunt chisel before folding it. |
| 2 |
0:28 |
The same applies in step 5b. |
| 3 |
1:22 |
A helpful trick, in case the lateral flaps get stuck while folding. |
|
|
| |
- |
Execute folding step 6, just like for the Ls (no Video Clip) (see Clip 4.16 00:24) |
| 1 |
0:00 |
Place the inner box in the stand. |
| 2 |
0:03 |
Place the pressure board Jig 4.5b |
| 3 |
0:06 |
Fold the front panel |
| 4 |
0:09 |
Slide the folding aid Jig 4.2f between flap and pressure board |
| 5 |
0:12 |
Fold the upper flap sideways |
| 6 |
0:15 |
Finish the bending of the flap using pressing block Jig 4.3a. |
| 7 |
0:18 |
Repeat the same steps for the upper rear flap |
| 8 |
0:21 |
Check the upper flaps all way round |
|
|
Important note:
Folding the inner box or tub using the simplified template
When the shooting of the film on the construction of the inner box of the LAZOLA had reached the point of joining
the outer and inner box, the idea came up to simplify the upper flaps of the inner box.
As will be explained in Section 5, we decided to cover the top flaps with a frame of 2 mm strong aluminium profiles.
Thus the overlapping of the top flaps in the corners became redundant. This simplified the folding of the inner box considerably.
The clips concerning the new paper template should have been shot anew. Alas, time did not suffice for that.
In the future, the simplified template for constructing the inner box will be supplied. The sequence of steps remains unchanged.
|